GOTEK Flashing

Introduction
Depending who you talk to, the actual flashing of an GOTEK drive with the Messsinger firmware is either easy or hell itself. Personally my GOTEK decdided to challenge me alot, but after a hile I won the fight. I spent several hours googling around, reading in forums and asked around among the friends I have.
So to spare some of you the trouble I had, I decided to document and publish it.
[styledbox type=”general” width=”512″ align=”center”][imageeffect type=”none” align=”alignleft” width=”25″ height=”90″ alt=”” url=”https://www.ikod.se/wp-content/uploads/2015/01/important.png” ]This guide could not have been done without the excellent job by Hervé Messinger. All the time and effort he has put in writing and debugging this code it is worth a lot for me and hopefully for you also since you read this guide.
Respect his wish and do not sell GOTEK drives with his firmware on it![/styledbox]
Things needed
- Windows 7 Pro/Home/Ultimate ( I used Swedish in this guide ).
- GOTEK Drive ( model SFR1M44-U100K was used in this guide ).
- STMFlashLoader ( Download it here… ).
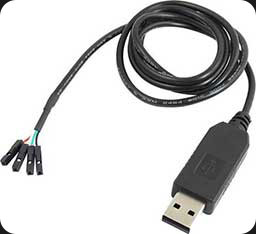
- USB to Serial cable
The USB-to-Serial cable I used is a very common one that I bought from Kjell.com with part number 87898 and I had to pay around $12,50 USD for it. Sadly the adapter does not work with Windows 8/8.1. For reference the adapter looks like this.

Installing the flash application
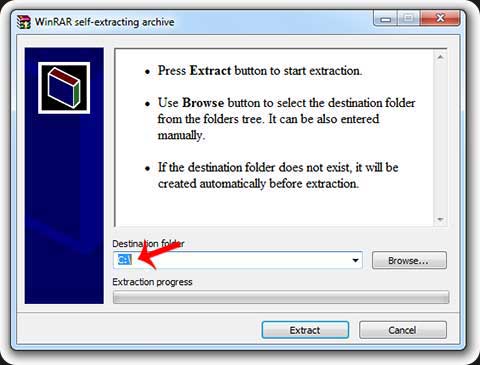
- Extract CortexAmigaFloppy.exe by dubbel-clicking on the icon.
![]()
- A warning will be issued, click on “Run”.

- Choose the path “C:\”.

Connect your GOTEK drive
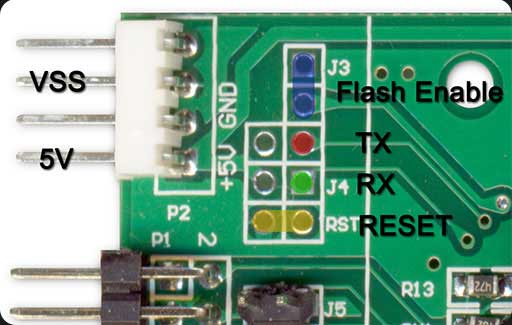
The GOTEK model SFR1M44-U100K has the following pin-out.

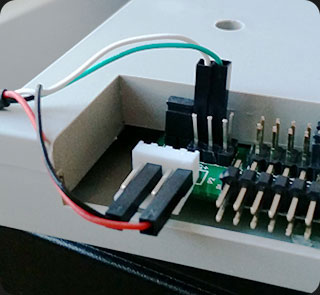
Before you will be able to do any flash at all on the GOTEK you need to enable flashing by making short circuit “Flash Enable”. I prefer to solder pins instead of using the holes, you can find those at Kjell.com with the part number 87856. After the device has been put into “Flash Enable” you need to connect TX, RX, 5V and VSS, just as the picture below shows.
If you are using the same type of USB-to-Serial adapter as I do, the connection should me done as the picture below.

Many forums state that you have to use an external power source, such as the internal 5V from the floppy power. But using the 3.3V from the USB worked just fine for me. In my example below I will use COM-port 16, that might not be the correct port for you so please check your device manager in Windows 7 for what COM-port number the USB-to-Serial adapter has been assigned.
Every time I use STMFlashLoader.exe I will use the option –pn 16 since that tells the STMFlashLoader.exe that I will use COM-port 16.
It is time to flash the GOTEK
- Press the Windows + “r” key to show the “Run” window.
- Type in “CMD” without quotes and then click “OK”.
- Type “cd C:\Cortex” and then press “Enter”
- De-activate any active read-only-mode on the GOTEK with the following command (followed by pressing Enter):
STMFlashLoader.exe -c –pn 16 -p –drp
- If the de-activation was successful you will be able to see the following text.
[styledbox type=”general” width=”512″ align=”center”]c:\Cortex>STMFlashLoader.exe -c –pn -p –drp
Opening Port [OK]
disabling read protection [KO][/styledbox]
- Initiate the actual flashing with the command (followed by pressing Enter):
STMFlashLoader.exe -c –pn 16 -i STM32F1_Connectivity-line_128K -d –fn fw.hex –v
- The STMFlashLoader.exe will reply with the following.
[styledbox type=”general” width=”512″ align=”center”]Opening Port [OK]
Activating device [KO]
Unrecognized device… Please, reset your device then try again
Please, reset your device then press any key to continue
Press any key to continue …
Opening Port [OK]
Activating device [KO]
No response from the target, the Boot loader can not be started.
Please, verify the boot mode configuration, reset your device then try again.
Please, reset your device then then press any key to continue
[/styledbox]
- Do a reset on the GOTEK by short-circuit “RESET”. I used a naked copper wire and had it short-circued for about 2 seconds. The same time that you release “RESET, press “Enter” and IF you are lucky the flashing will begin! Please notice that this usually takes some timing and might not work on the first try.
A successful flashing
When the timing is right and you manage to flash the device it will look like something similar.
[styledbox type=”general” width=”512″ align=”center”]Opening Port [OK]
Activating device [OK]
DOWNLOADING …
downloading page 0 @0x 8000000 size 2.00( KB ) [OK]
downloading page 1 @0x 8000800 size 2.00( KB ) [OK]
downloading page 2 @0x 8001000 size 2.00( KB ) [OK]
downloading page 3 @0x 8001800 size 2.00( KB ) [OK]
downloading page 4 @0x 8002000 size 2.00( KB ) [OK]
downloading page 5 @0x 8002800 size 2.00( KB ) [OK]
downloading page 6 @0x 8003000 size 2.00( KB ) [OK]
downloading page 7 @0x 8003800 size 2.00( KB ) [OK]
downloading page 8 @0x 8004000 size 2.00( KB ) [OK]
downloading page 9 @0x 8004800 size 2.00( KB ) [OK]
downloading page 10 @0x 8005000 size 2.00( KB ) [OK]
downloading page 11 @0x 8005800 size 2.00( KB ) [OK]
downloading page 12 @0x 8006000 size 2.00( KB ) [OK]
downloading page 13 @0x 8006800 size 2.00( KB ) [OK]
downloading page 14 @0x 8007000 size 2.00( KB ) [OK]
downloading page 15 @0x 8007800 size 2.00( KB ) [OK]
downloading page 16 @0x 8008000 size 2.00( KB ) [OK]
downloading page 17 @0x 8008800 size 2.00( KB ) [OK]
downloading page 18 @0x 8009000 size 2.00( KB ) [OK]
downloading page 19 @0x 8009800 size 2.00( KB ) [OK]
downloading page 20 @0x 800A000 size 2.00( KB ) [OK]
downloading page 21 @0x 800A800 size 2.00( KB ) [OK]
downloading page 22 @0x 800B000 size 2.00( KB ) [OK]
downloading page 23 @0x 800B800 size 2.00( KB ) [OK]
downloading page 24 @0x 800C000 size 2.00( KB ) [OK]
downloading page 25 @0x 800C800 size 2.00( KB ) [OK]
downloading page 26 @0x 800D000 size 2.00( KB ) [OK]
downloading page 27 @0x 800D800 size 2.00( KB ) [OK]
downloading page 28 @0x 800E000 size 2.00( KB ) [OK]
downloading page 29 @0x 800E800 size 2.00( KB ) [OK]
downloading page 30 @0x 800F000 size 1.42( KB ) [OK]
VERIFYING …
verifying page 0 @0x 8000000 size 2.00( KB ) [OK]
verifying page 1 @0x 8000800 size 2.00( KB ) [OK]
verifying page 2 @0x 8001000 size 2.00( KB ) [OK]
verifying page 3 @0x 8001800 size 2.00( KB ) [OK]
verifying page 4 @0x 8002000 size 2.00( KB ) [OK]
verifying page 5 @0x 8002800 size 2.00( KB ) [OK]
verifying page 6 @0x 8003000 size 2.00( KB ) [OK]
verifying page 7 @0x 8003800 size 2.00( KB ) [OK]
verifying page 8 @0x 8004000 size 2.00( KB ) [OK]
verifying page 9 @0x 8004800 size 2.00( KB ) [OK]
verifying page 10 @0x 8005000 size 2.00( KB ) [OK]
verifying page 11 @0x 8005800 size 2.00( KB ) [OK]
verifying page 12 @0x 8006000 size 2.00( KB ) [OK]
verifying page 13 @0x 8006800 size 2.00( KB ) [OK]
verifying page 14 @0x 8007000 size 2.00( KB ) [OK]
verifying page 15 @0x 8007800 size 2.00( KB ) [OK]
verifying page 16 @0x 8008000 size 2.00( KB ) [OK]
verifying page 17 @0x 8008800 size 2.00( KB ) [OK]
verifying page 18 @0x 8009000 size 2.00( KB ) [OK]
verifying page 19 @0x 8009800 size 2.00( KB ) [OK]
verifying page 20 @0x 800A000 size 2.00( KB ) [OK]
verifying page 21 @0x 800A800 size 2.00( KB ) [OK]
verifying page 22 @0x 800B000 size 2.00( KB ) [OK]
verifying page 23 @0x 800B800 size 2.00( KB ) [OK]
verifying page 24 @0x 800C000 size 2.00( KB ) [OK]
verifying page 25 @0x 800C800 size 2.00( KB ) [OK]
verifying page 26 @0x 800D000 size 2.00( KB ) [OK]
verifying page 27 @0x 800D800 size 2.00( KB ) [OK]
verifying page 28 @0x 800E000 size 2.00( KB ) [OK]
verifying page 29 @0x 800E800 size 2.00( KB ) [OK]
verifying page 30 @0x 800F000 size 1.42( KB ) [OK]
c:\Cortex>
[/styledbox]
Still doesn’t work??
Q: The STMFlashLoader.exe informs that the GOTEK unit still is write-protected / Read-only.
A: Change the flashing command to:
cd C:\Cortex
STMFlashLoader.exe -c –pn 16 -i STM32F1_Connectivity-line_128K -p –drp -d –fn fw.hex –v

Hi,
so … what’s the right command for flashing in cmd?
I only removed the write protection using:
STMFlashLoader.exe -c –pn 16 -p –drp
c:\Cortex>STMFlashLoader.exe -c –pn -p –drp
Opening Port [OK]
disabling read protection [KO]
After this i wrote this (the only thing i found in the net):
STMFlashLoader.exe -c –pn 16 -i STM32F1_Connectivity-line_128K -d –fn fw.hex –v (i changed the fw.hex with the firmware CortexAmigaFloppyEmulator_1.05a.hex).
What “STM32F1_Connectivity-line_128K” stands for?
I only get:
Opening Port [OK]
This version is not intended to support the [STM32F1_Connectivity-line_128K] target
What could be wrong and what is the correct commandline command to flash?
Thanks.
Hi!
It seems that my guide had gone back to an earlier version where double dashes had been stripped away and the link was gone.
Please download the file I have on my page and then do everything again.
Please note that some commands have -- instead of -
Good luck 🙂
Thanks pal, you’re great.
It worked great after some problems.
*thumbs up*
Greetz
Tom
Dear Ikod,
First, thank you for this blog. Your shared information is gold.
This question may sound crazy, but I try anyway. After you, have disabling the read protection would it then also be possible to “download” the original .Hex Gotek file down to your PC?
Hi Anse,
Thanks 🙂 Actually I have not tried to download the original .hex from the GOTEK. Might do that to test 🙂
Hi,
I have a Gotek and Q6 Mossfet N Channel is blown. Would you have any idea what would be a working replacement Part number?
Thanks in Advance,
Garry
I’m not 100% sure, but something like this: http://www.digikey.se/product-detail/en/diodes-incorporated/2N7002-7-F/2N7002-FDIDKR-ND/1837844
Hello highpuff,
I would like to try your firmware. But before I overwrite the original firmware, I would like to make a backup. Do you have an idea how I can backup the original firmware before?
Best regards
mikrotik75
Hi mikrotik75,
With original firmware you mean the one that the GOTEK is shipped with?
Hi highpuff,
yes, I would save the original GOTEK firmware.
Try using http://sourceforge.net/projects/stm32flash/
Works without reseting 😉
Thanks for the tip! Will try it ASAP 🙂
This was the only way I could get my GOTEK to flash. Everything else I tried would not work. I used stm32flash.exe COM3 (which is what my programmer showed up as) and got a good response describing the drive. I did notice that it was showing to use a baud of 57600, which may have been a problem with other methods. Then I used stm32flash.exe -k COM3 to disable read protection. Followed by stm32flash.exe -u COM3 to disable write protection. And finally, stm32flash.exe -w fw.hex COM3 to write the firmware to the drive. Then added the speaker mod, OLED mod and plugged it into my A1200 and all was fine.
This ended days of misery for me. thanks! This is a much more reliable way of flashing the device. Worked first time. Also worth mentioning that not all usb-serial devices are created equal. My arduino2serial didn’t work at all, but a cheap FT232 clone from amazon did.
Happy that I could help 🙂
Hello Highpuff —
I don’t know what the “Messsinger firmware” is, but I re-flashed my Gotek with the “flash floppy” firmware. Used the ST tool, and it worked well. However, can’t get it to work in place of a conventional 3.5″ floppy on a plain-Jane PC. Get “not ready” or “busy” when I try to access it. Do you know if the Gotek works on a PC? Do you know of a spot on-line that might have a copy of the original firmware (installed on the Gotek when purchased) so I could try flashing that? See if I can get it to work on a PC?
Roger
No, sorry I don’t know where to find the original GOTEK firmware. But what I do know is that FlashFloppy by KierF is said to work on a PC.
Does Cortex firmware support piezo speaker in attacjed tp pins JB ?
I have not tried it but I suppose it does. I have moved over to Flashfloppy now since it is still being developed.
Hi there.
Does anyone have the original gotek firmware that can share 1m44 version and the 720k
Kind regards
Sorry, I do not 🙁